ubuntu14.04LTS��װnginx+mariaDB+php7+YAF��Ҫ��
���Ľ�����ubuntu14.04LTS��װnginx+mariaDB+php7+YAF��Ҫ�졣��������ҹ���Ҳο����������£�
ubuntu apt-get��ʽ��װnginx
���
http://nginx.org/en/linux_packages.html
����
in order to authenticate the nginx repository signature and to eliminate warnings about missing PGP key during installation of the nginx package, it is necessary to add the key used to sign the nginx packages and repository to the apt program keyring.
������Կ
wget http://nginx.org/keys/nginx_signing.key
Ȼ������
sudo apt-key add nginx_signing.key
�μ�nginx��repository
cd /etc/apt/sources.list.d/
sudo vim nginx.list
����װ���Ұ汾����������������
deb http://nginx.org/packages/ubuntu/ trusty nginx
deb-src http://nginx.org/packages/ubuntu/ trusty nginx
�����°汾���������������ݣ�
deb http://nginx.org/packages/mainline/ubuntu/ trusty nginx
deb-src http://nginx.org/packages/mainline/ubuntu/ trusty nginx
Ȼ��װ
apt-get update
apt-get install nginx
��װ���
nginx -v
nginx version: nginx/1.8.0
MariaDB���ݿⰲװ
MariaDB��һ����Դ���ݿ���100%��MySQL���ݣ�ָ�����滻MySQL���ݿ⡣
MariaDB�ı��� :
2008�꣬MySQL��������Oracle��2010���չ���Sun Microsystems�չ��ˡ� �����Sun��ҵ���չ���Ϊ�����Ŀ����Ҫ������MySQL�����Ļ���������������в�û������̫�ã���������Oracle���չ�����������ԶԶ����Ԥ �ڡ��ܶ�MySql�Ŀ�����������Sun��Oracle��ҵ�����µ���Ŀ���������м����MySQL���½����Լ���Ŀ���ڼ�����ͷ��֮һ��Michael 'Monty' Widenius��Monty�������Ŷ��½���MySQL��һ��fork�汾����������ΪMariaDB��
Ĭ����MariaDB�İ���û����Ubuntu�ֿ��С�Ҫ��װMariaDB����������Ҫ����MariaDB�ֿ⡣
���� MariaDB �ֿ�
sudo apt-get install software-properties-common
sudo apt-key adv --recv-keys --keyserver hkp://keyserver.ubuntu.com:80 0xcbcb082a1bb943db
Executing: gpg --ignore-time-conflict --no-options --no-default-keyring --homedir /tmp/tmp.3GolFM9PZ5 --no-auto-check-trustdb --trust-model always --keyring /etc/apt/trusted.gpg --primary-keyring /etc/apt/trusted.gpg --recv-keys --keyserver hkp://keyserver.ubuntu.com:80 0xcbcb082a1bb943db
gpg: requesting key 1BB943DB from hkp server keyserver.ubuntu.com
gpg: key 1BB943DB: public key "MariaDB Package Signing Key <package-signing-key@mariadb.org>" imported
gpg: Total number processed: 1
gpg:        imported: 1
sudo add-apt-repository 'deb http://sfo1.mirrors.digitalocean.com/mariadb/repo/10.0/ubuntu trusty main'
��װ MariaDB :
sudo apt-get update
sudo apt-get install mariadb-server
�ڰ�װ�У���ᱻҪ������MariaDB��root���롣
�����������ᵽMariaDB :
keyun@ubuntu-server:~$ mysql -u root -p
Enter password:
Welcome to the MariaDB monitor. Commands end with ; or \g.
Your MariaDB connection id is 43
Server version: 10.0.23-MariaDB-1~trusty-log mariadb.org binary distribution
Copyright (c) 2000, 2015, Oracle, MariaDB Corporation Ab and others.
Type 'help;' or '\h' for help. Type '\c' to clear the current input statement.
MariaDB [(none)]>
MariaDB ����
sudo /etc/init.d/mysql stop
sudo /etc/init.d/mysql start
����ֻ����Ubuntu��װ��MariaDB,����Ҫ����MariaDB������;����
1��Ҫ��Ubuntu�����÷���ǽ����iptables����Ļ�,�����д�
2��3306�˿��Dz���û�д�
����nestat����鿴3306�˿�״̬��
~# netstat -an | grep 3306
tcp 0 0 127.0.0.1:3306 0.0.0.0:* LISTEN
��Ч�����Կ���3306�˿�ֻ����IP 127.0.0.1�ϼ��������Ծܾ�������IP�ķ��ʡ�
���Ҫ�죺��/etc/mysql/my.cnf�ļ������ļ����ҵ��������ݣ�
# Instead of skip-networking the default is now to listen only on
# localhost which is more compatible and is not less secure.
bind-address = 127.0.0.1
��������һ��ע�͵����߰�127.0.0.1���ɺ��ʵ�IP������ע�͵���
����������������netstat��⣺
~# netstat -an | grep 3306
tcp    0   0 0.0.0.0:3306      0.0.0.0:*        LISTEN
1. �ѻ�ԱȨ�������;��Ա��
��¼��mysql������������grant�������Ȩ��
��ɺ�����mysql�������ᣬ���ѳɹ���Ϊ��ȷ��ȷ�����ٳ�;��½����һ�¡�
��װPHP7
��������С����װ��ubuntu���Ȱ�װmake
sudo apt-get install make
����Դ��
sudo wget https://downloads.php.net/~ab/php-7.0.2RC1.tar.gz
sudo tar -zvxf php-7.0.2RC1.tar.gz
cd php-7.0.2RC1
�������ָ�ӣ���װgcc4.8
������һ��ı�����, �ټ�GCC 4.8����, ����ֻҪGCC 4.8����PHP�ŻῪ��Global Register for opline and execute_data֧��, ��������5%���ҵĻ��ܽ���(Wordpres��QPS�Ƕȵ���) ��ʵGCC 4.8֮ǰ�İ汾Ҳ֧��, �������Ƿ�����֧�ŵ���Bug, ���Ա�����4.8���ϵİ汾�ŻῪ���������.
sudo apt-get install python-software-properties
sudo add-apt-repository ppa:ubuntu-toolchain-r/test
sudo apt-get update
sudo apt-get install gcc-4.8 g++-4.8
sudo update-alternatives --remove-all gcc
sudo update-alternatives --remove-all g++
sudo update-alternatives --install /usr/bin/gcc gcc /usr/bin/gcc-4.8 20
sudo update-alternatives --install /usr/bin/g++ g++ /usr/bin/g++-4.8 20
sudo update-alternatives --config gcc
sudo update-alternatives --config g++
sudo apt-get update
sudo apt-get upgrade -y
sudo apt-get dist-upgrade
�鿴�汾
gcc --version
gcc (Ubuntu 4.8.5-2ubuntu1~14.04.1) 4.8.5
Copyright (C) 2015 Free Software Foundation, Inc.
This is free software; see the source for copying conditions. There is NO
warranty; not even for MERCHANTABILITY or FITNESS FOR A PARTICULAR PURPOSE.
�Ȱ�װ����
sudo apt-get install libxml2
sudo apt-get install libxml2-dev
sudo apt-get install openssl
sudo apt-get install libssl-dev
sudo apt-get install curl
sudo apt-get install libcurl4-openssl-dev
sudo apt-get install libgd-dev
sudo apt-get install libxslt-dev
��libĿ¼��/usr/lib/x86_64-linux-gnu
./configure �Cprefix=/usr/local/php �Cwith-curl �Cwith-freetype-dir �Cwith-gd �Cwith-gettext �Cwith-iconv-dir �Cwith-kerberos �Cwith-libdir=lib/x86_64-linux-gnu �Cwith-libxml-dir �Cwith-mysqli �Cwith-openssl �Cwith-pcre-regex �Cwith-pdo-mysql �Cwith-pdo-sqlite �Cwith-pear �Cwith-png-dir �Cwith-xmlrpc �Cwith-xsl �Cwith-zlib �Cenable-fpm �Cenable-bcmath �Cenable-libxml �Cenable-inline-optimization �Cenable-gd-native-ttf �Cenable-mbregex �Cenable-mbstring �Cenable-opcache �Cenable-pcntl �Cenable-shmop �Cenable-soap �Cenable-sockets �Cenable-sysvsem �Cenable-xml �Cenable-zip sudo make sudo make install sudo cp php.ini-development /usr/local/php/lib/php.ini sudo cp /usr/local/php/etc/php-fpm.conf.default /usr/local/php/etc/php-fpm.conf sudo cp /usr/local/php/etc/php-fpm.d/www.conf.default /usr/local/php/etc/php-fpm.d/www.conf sudo cp ./sapi/fpm/init.d.php-fpm /etc/init.d/php-fpm
���һ�����������php-fpm��ϵͳ��������
Ӧ��php�Դ���php-fpm�������ߣ����Ժ������start��stop��restart
���������ߴ�Դ�����ŵ�php/sbin�ļ������������
sudo cp ./sapi/fpm/init.d.php-fpm /usr/local/php/sbin/
sudo cd /usr/local/php/sbin/
sudo chmod 755 init.d.php-fpm
����nginx��php-fpm��ͨ��phpinfo(),��������
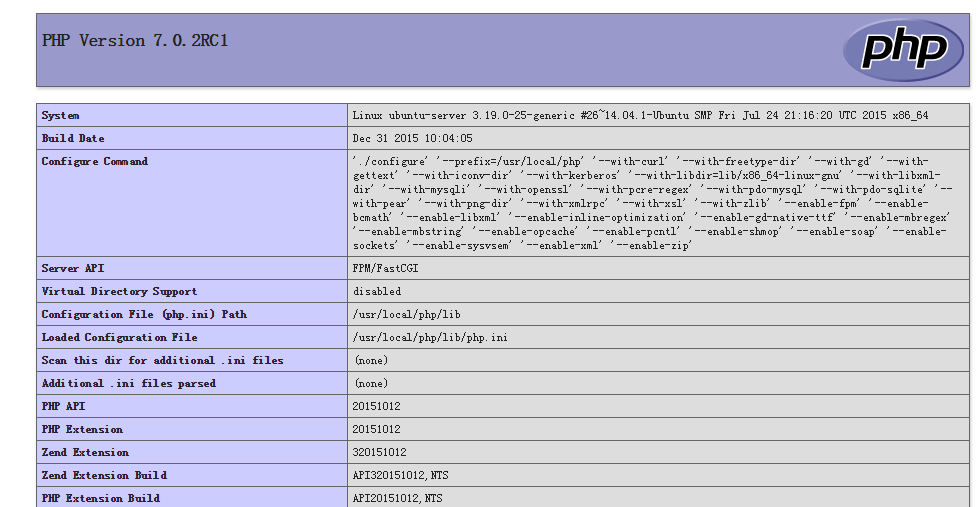
���ˣ�php7��װ�ɹ���
��װapache abѹ���
sudo apt-get install apache2-utils
ѹ��һ��
echo "hello world"
ab -n 1000 -c 20 http://10.81.36.158:9528/
QPS 7000����
����������opcache
sudo vi /usr/local/php/lib/php.ini
�ҵ�opcache����
������������
zend_extension=opcache.so
opcache.enable=1
opcache.enable_cli=1
��������php-fpm
sudo kill -USR2 `cat /usr/local/php/var/run/php-fpm.pid
����
sudo /usr/local/php/sbin/init.d.php-fpm restart
�ٴβ��ԣ�QPS������8000����
����HugePages
���//www.jb51.net/article/85491.htm
�ٴβ��ԣ�QPSżȻ�ܱ���10000
��װYAF
sudo wget http://pecl.php.net/get/yaf-3.0.2.tgz
sudo tar -zvxf yaf-3.0.2.tgz
��������, ����Yaf��Դ��Ŀ¼, ˳��ʩ��(����PHP_BIN��PHP��binĿ¼):
sudo /usr/local/php/bin/phpize
������
Cannot find autoconf. Please check your autoconf installation and the
$PHP_AUTOCONF environment variable. Then, rerun this script.
����취��
sudo apt-get install m4
sudo apt-get install autoconf
sudo apt-get install libpcre3 libpcre3-dev
phpizeʩ�к�
sudo ./configure --with-php-config=/usr/local/php/bin/php-config
sudo make
sudo make install
Installing shared extensions:   /usr/local/php/lib/php/extensions/no-debug-non-zts-20151012/
��װ�ɹ�����php.ini���μ�yaf��չ
extension=yaf.so
��������php-fpm���鿴phpinfo()

��װyaf�ɹ�
PS:����PDO�����У�ӿ�� SQLSTATE[HY000] [2002] No such file or directory ���
���飬��mysql.sock�Ҳ���
��phpinfo()�У�����pdo_mysql.default_socket��ֵ��/tmp/mysql.sock

�����ڷ������ϲ�û������ļ�
ͨ��sudo service mysql status ����
* /usr/bin/mysqladmin Ver 9.1 Distrib 10.0.23-MariaDB, for debian-linux-gnu on x86_64
Copyright (c) 2000, 2015, Oracle, MariaDB Corporation Ab and others.
Server version     10.0.23-MariaDB-1~trusty-log
Protocol version    10
Connection       Localhost via UNIX socket
UNIX socket       /var/run/mysqld/mysqld.sock
Uptime:         3 min 28 sec
�ҵ�sock�ļ���λ����/var/run/mysqld/mysqld.sock
������/tmp�� ����������
sudo ln -s /var/run/mysqld/mysqld.sock mysql.sock
��Ŀ���
ͨ��localhostû�����ʵ����ݿ⣬����ͨ��IP����
���������ǵ��͵�socketû��ȷ���õ�״����
����MySQL���ݿ������ַ�ʽ��TCP/IP�������˽�Ķ˿ڵ����֣���Unix���֣������socket����sock������ֲ�״���£�������localhost��������127.0.0.1��������MySQL����ʱ�����߲��ɻ��ã�����MySQL��Ȩ��������localhost��127.0.0.1Ҳ�Ƿֿ����õġ�������Ϊ127.0.0.1ʱ��ϵͳͨ��TCP/IP��ʽ�������ݿ⣻������Ϊlocalhostʱ��ϵͳͨ��socket��ʽ�������ݿ⡣
���������sudo service mysql status����
�õ�sock�ļ���λ����/var/run/mysqld/mysqld.sock
���ǣ���php.ini
pdo_mysql.default_socket=/var/run/mysqld/mysqld.sock
��������php-fpm
��Ŀ���
��Ը���������Դ��ubuntu����������������æ��
���ű�ǩ��dedeģ�� / destoonģ�� / dedecmsģ�� / ֯��ģ��