百分百源码网-让建站变得如此简单! 登录 注册 签到领金币!

主页 | 如何升级VIP | TAG标签

当前位置: 主页>网站教程>JS教程> 自定义ckeditor编辑器工具栏图文详解
分享文章到:

自定义ckeditor编辑器工具栏图文详解

发布时间:01/15 来源: 浏览: 关键词:
昨天因为一个需求我们需要自定义ckeditor编辑器工具栏并放入一个插件,下面我来给大家介绍我的记录笔记,有需要可学习学习。

1、首先下载并安装ckeditor。

2、自定义工具栏按钮:

我们可以自定义ckeditor工具栏要显示的按钮,工具栏按钮定义可以参考这里。

现在我们需要向工具栏添加一个自定义功能的按钮。ckeditor工具栏中的每个按钮都是作为插件定义在ckeditorplugins 目录中。我们在ckeditorplugins中创建一个新文件夹linkbutton。在linkbutton文件夹内,我们创建一个plugin.js文件,它的代码如下:

 代码如下

(function(){
    //Section 1 : 按下自定义按钮时执行的代码
    var a= {
        exec:function(editor){
            alert("这是自定义按钮");
        }
    },
    //Section 2 : 创建自定义按钮、绑定方法
    b='linkbutton';
    CKEDITOR.plugins.add(b,{
        init:function(editor){
            editor.addCommand(b,a);
            editor.ui.addButton('linkbutton',{
                label:'Link Button',
                icon: this.path + 'logo_ckeditor.png',
                command:b
            });
        }
    });
})();

在上面的代码中我们指定自定义按钮的图标logo_ckeditor.png,logo_ckeditor.png放在linkbutton文件夹中。
接下来我们需要注册linkbutton插件

-adding-a-new-toolbar-button/原文中的给出方法是在ckeditor.js中注册,这会使以后升级新版本遇到困难。提倡使用下面的方法在config.js中注册自定义插件:

 代码如下

CKEDITOR.editorConfig = function( config )
{
    // Define changes to default configuration here. For example:
    // config.language = 'fr';
    // config.skin = 'office2003';
    config.extraPlugins="linkbutton"
};

最后,在ckeditor中显示自定义按钮linkbutton,代码如下:

 代码如下

<!DOCTYPE html>
<html>
<head>
<meta http-equiv="Content-Type" content="text/html; charset=gb2312" />
<title>自定义按钮</title>
<script type="text/javascript" src="ckeditor.js"></script>
<style type="text/css">
body{font-size:12px;line-height:1.8;font-family:'微软雅黑';}
</style>
</head>
 
<body>
<textarea id="ckeditor"></textarea>
<script type="text/javascript">
    CKEDITOR.replace( 'ckeditor',{
        toolbar :
            [
                [ 'Bold', 'Italic', '-', 'NumberedList', 'BulletedList', '-', 'Link', 'Unlink','-','linkbutton' ]
            ],
        extraPlugins:"linkbutton"    //注册linkbutton,也可在config.js中注册
    });
</script>
</body>
</html>

注意:自定义插件的名称必须在任何地方都要保持一致。


写一个demo.html文件进行测试

      我们在${ckeditor}根目录下建立一个demo.html文件来测试下我们刚写的插件是否有效,内容如下:

 代码如下

<html><head> <title>CKEditor插件编写示例-Powered By mzone.cc</title> <meta http-equiv="Content-Type" content="text/html; charset=utf-8"/> <script type="text/javascript" src="ckeditor.js"></script></head><body> <textarea cols="80" id="editor1" name="editor1" rows="10">This is the content!</textarea> <script>  CKEDITOR.replace("editor1", {   toolbar : 'MyBasic',   height : 300,   width : 800  }); </script></body></html>     


然后在浏览器中打开demo.html文件,就可以看到在编辑器的工具栏中最后一个就是我们刚写的插件了,如下图所示:
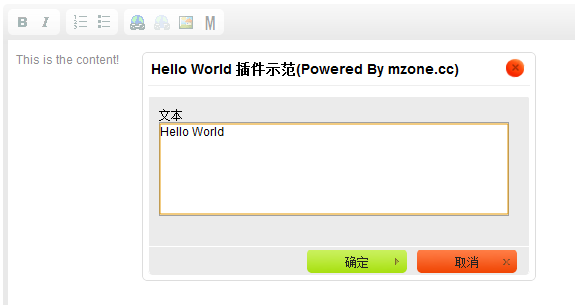
 

CKEditor中helloworld插件运行截图

打赏

打赏

取消

感谢您的支持,我会继续努力的!

扫码支持
扫码打赏,你说多少就多少

打开支付宝扫一扫,即可进行扫码打赏哦

百分百源码网 建议打赏1~10元,土豪随意,感谢您的阅读!

共有4人阅读,期待你的评论!发表评论
昵称: 网址: 验证码: 点击我更换图片
最新评论

本文标签

广告赞助

能出一分力是一分吧!

订阅获得更多模板

本文标签

广告赞助

订阅获得更多模板