centos搭建git服务器(完整教程)
[root@163-44-167-134 ~]# yum -y install git
#查看git版本号
[root@163-44-167-134 ~]# git --vistion
#gitosis为Git用户权限管理系统,通过管理服务端的/home/git/.ssh/authorized_key文件来执行对用户权限的管理,是一个python模块包
[root@163-44-167-134 ~]# yum -y install python python-setuptools
[root@163-44-167-134 ~]# git clone git://github.com/res0nat0r/gitosis.git
[root@163-44-167-134 ~]# cd gitosis/
[root@163-44-167-134 ~]# python setup.py install
#显示Finished processing dependencies for gitosis==0.2即表示成功
#添加git用户
[root@163-44-167-134 ~]# useradd git
[root@163-44-167-134 ~]# su git
[git@163-44-167-134 root]$ cd ~
#git管理用户生产密钥并上传到服务器端
#有些人把git管理用户和git服务端放在两台服务器,完全没必要
[git@163-44-167-134 ~]$ ssh-keygen -t rsa
[git@163-44-167-134 ~]$ gitosis-init <~/.ssh/id_rsa.pub
#报错
Traceback (most recent call last):
File "/usr/bin/gitosis-init", line 9, in <module>
load_entry_point('gitosis==0.2', 'console_scripts', 'gitosis-init')()
File "/usr/lib/python2.7/site-packages/gitosis-0.2-py2.7.egg/gitosis/app.py", line 24, in run
return app.main()
File "/usr/lib/python2.7/site-packages/gitosis-0.2-py2.7.egg/gitosis/app.py", line 38, in main
self.handle_args(parser, cfg, options, args)
File "/usr/lib/python2.7/site-packages/gitosis-0.2-py2.7.egg/gitosis/init.py", line 123, in handle_args
user = ssh_extract_user(pubkey)
File "/usr/lib/python2.7/site-packages/gitosis-0.2-py2.7.egg/gitosis/init.py", line 39, in ssh_extract_user
raise InsecureSSHKeyUsername(repr(user))
gitosis.init.InsecureSSHKeyUsername: Username contains not allowed characters: 'git@163-44-167-134'
[git@163-44-167-134 ~]$ vim ~/.ssh/id_rsa.pub
#将证书末尾的 git@163-44-167-134 改成 git@localhost
#这一步不报错的可以无视
[git@163-44-167-134 ~]$ gitosis-init <~/.ssh/id_rsa.pub
Initialized empty Git repository in /home/git/repositories/gitosis-admin.git/
Reinitialized existing Git repository in /home/git/repositories/gitosis-admin.git/
[git@163-44-167-134 ~]$ ls
gitosis repositories
[git@163-44-167-134 ~]$ mkdir github
[git@163-44-167-134 ~]$ cd github/
[git@163-44-167-134 github]$ git clone git@163.44.167.134:gitosis-admin.git
Cloning into 'gitosis-admin'...
The authenticity of host '163.44.167.134 (163.44.167.134)' can't be established.
ECDSA key fingerprint is a1:e3:dc:f2:aa:49:3b:5f:9f:93:0f:dd:6e:d4:ed:32.
Are you sure you want to continue connecting (yes/no)? yes
Warning: Permanently added '163.44.167.134' (ECDSA) to the list of known hosts.
remote: Counting objects: 5, done.
remote: Compressing objects: 100% (4/4), done.
remote: Total 5 (delta 0), reused 5 (delta 0)
Receiving objects: 100% (5/5), done.
#这样就克隆了配置
[git@163-44-167-134 github]$ cd gitosis-admin/
[git@163-44-167-134 gitosis-admin]$ ls
gitosis.conf keydir
#gitosis.conf为配置项目和用户文件,keydir为公钥目录
[git@163-44-167-134 gitosis-admin]$ vim gitosis.conf
[gitosis]
[group gitosis-admin]
members = git@localhost
writable = gitosis-admin
#修改下(添加一个项目)
[group github]
writable = github
members = git@localhost
[git@163-44-167-134 gitosis-admin]$ cd ../../repositories/
[git@163-44-167-134 repositories]$ mkdir github.git
[git@163-44-167-134 repositories]$ cd github.git/
#初始化一个项目
[git@163-44-167-134 github.git]$ git init --bare
Initialized empty Git repository in /home/git/repositories/github.git/
[git@163-44-167-134 root]$ cd ~
[git@163-44-167-134 ~]$ mkdir test
[git@163-44-167-134 ~]$ cd test/
[git@163-44-167-134 test]$ git clone git@163.44.167.134:github.git
Cloning into 'github'...
warning: You appear to have cloned an empty repository.
[git@163-44-167-134 github]$ touch test1.txt
#添加
[git@163-44-167-134 github]$ git add .
#提交
[git@163-44-167-134 github]$ git commit -a -m "granted jay commit rights to git-test"
#报错
fatal: Not a git repository (or any of the parent directories): .git
[git@163-44-167-134 github]$ cd gitosis-admin/
[git@163-44-167-134 gitosis-admin]$ git add .
[git@163-44-167-134 gitosis-admin]$ git commit -a -m "granted jay commit rights to git-test"
*** Please tell me who you are.
Run
git config --global user.email "you@example.com"
git config --global user.name "Your Name"
to set your account's default identity.
Omit --global to set the identity only in this repository.
fatal: empty ident name (for <git@163-44-167-134.(none)>) not allowed
#随便写
[git@163-44-167-134 gitosis-admin]$ git config --global user.name "gituser"
[git@163-44-167-134 gitosis-admin]$ git config --global user.email "gituser@gituser.com"
#再次提交
[git@163-44-167-134 github]$ git commit -a -m "granted jay commit rights to git-test"
[master (root-commit) dc1958d] granted jay commit rights to git-test
1 file changed, 0 insertions(+), 0 deletions(-)
create mode 100644 test1.txt
#提交到主版本
[git@163-44-167-134 gitosis-admin]$ git push origin master
上面服务器端已经搭建好了,现在主要介绍用户怎么连接搭建好的git服务器。
一、win连接git服务器
1、下载 git.exe
2、下载 TortoiseGit (可以选择语言包一起)
TortoiseGit下载页面: http://download.tortoisegit.org/tgit/
提示:不下git.exe, TortoiseGit压根用不了
安装好,鼠标右键 Git Bash Here,单击。一个类似crt/putty的客户端。
#生成公钥
$ ssh-keygen -t rsa
#将生成的公钥(id_rsa.pub)传到linux上去。
#git服务器
#/home/git/github/gitosis-admin
[git@163-44-167-134 gitosis-admin]$ vim gitosis.conf
[gitosis]
[group gitosis-admin]
members = git@localhost
writable = gitosis-admin
[group github]
writable = github
#添加一个用户 Administrator@PC201601191552
members = git@localhost Administrator@PC201601191552
[git@163-44-167-134 gitosis-admin]$ cd keydir/
#将win生成的公钥移动到这个目录下,并保持名字一样
#比如 mv /tmp/id_rsa.pub Administrator@PC201601191552.pub
#还有这两个名字要和公钥内部的后缀保持一致(轻易不要动她就好)
[git@163-44-167-134 keydir]$ ls
Administrator@PC201601191552.pub git@localhost.localdomain.pub
#提交修改的权限文件和公钥
[git@163-44-167-134 github]$ git add .
[git@163-44-167-134 github]$ git commit -a -m "granted jay commit rights to git-test"
[git@163-44-167-134 gitosis-admin]$ git push origin master
#切回window git bash
$ git clone git@163.44.167.134:github.git
$ cd github/
#如果git服务器之前有文件,克隆下来就可以看到
$ touch test.log
$ git add .
$ git commit -a -m "granted jay commit rights to git-test"
#提交到git服务器了
$ git push origin master
#git服务器可以git pull拉取到提交的test.log
#基本所有的命令都跟linux一个样。
对于小白用户,只能说是臣妾做不到,只有TortoiseGit了。
同样,设置下证书即可。
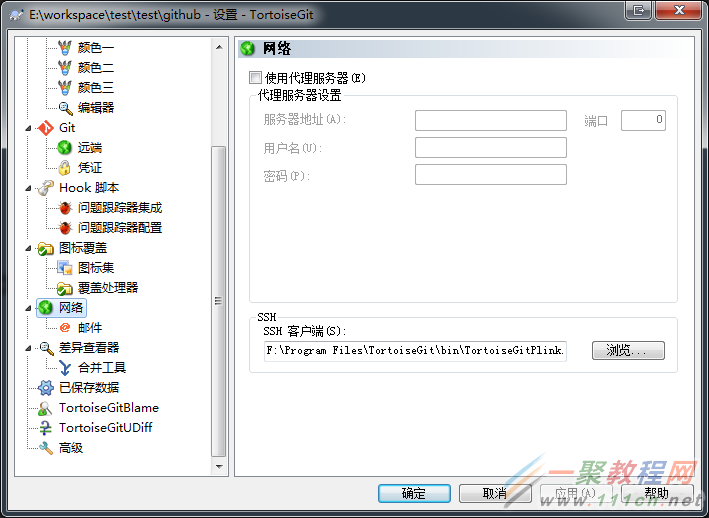
在图片中ssh客户端的路径找到puttygen.exe
点击Generate,生成私钥和公钥(这个坑爹的软件,鼠标放在上面动动,生成超快,不动半个小时都生成不出来)。
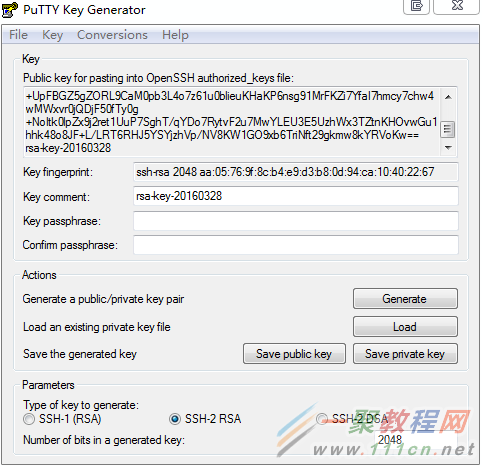
将框中的公钥上传或者复制到git服务器,同Git Bash一样的流程,添加用户,添加keydir中的文件。提交到主版本。
点击save private key,保存一个路径。
图片中选中,浏览putty秘钥的路径,远端的这些url可能需要你自己填写,因为我先弄Git Bash,所以这里有显示。
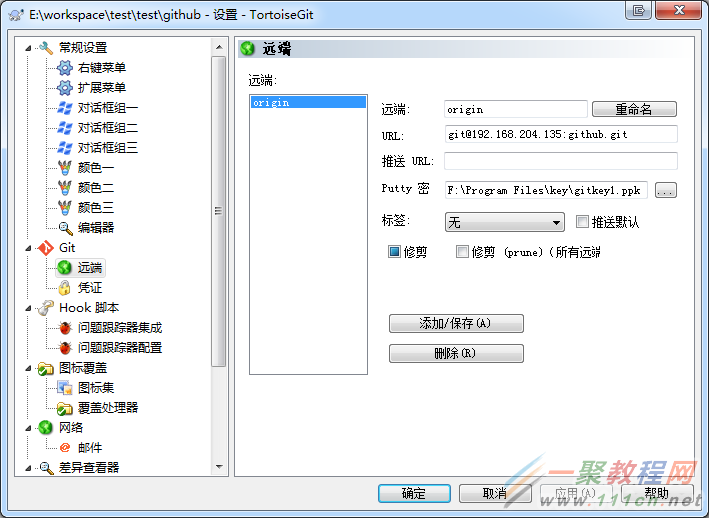
这时客户端也可以不用密码就可以提交和拉取文件了。


