Linux下Nagios监控linux+windows的安装与配置
一、Nagios简介
Nagios是一款开源的电脑系统和网络监视工具,能有效监控Windows、Linux和Unix的主机状态,交换机路由器等网络设置,打印机等。在系统或服务状态异常时发出邮件或短信报警第一时间通知网站运维人员,在状态恢复后发出正常的邮件或短信通知。
Nagios原名为NetSaint,由Ethan Galstad开发并维护至今。NAGIOS是一个缩写形式: "Nagios Ain't Gonna Insist On Sainthood" Sainthood 翻译为圣徒,而"Agios"是"saint"的希腊表示方法。Nagios被开发在Linux下使用,但在Unix下也工作得非常好。
主要功能
•网络服务监控(SMTP、POP3、HTTP、NNTP、ICMP、SNMP、FTP、SSH)
•主机资源监控(CPU load、disk usage、system logs),也包括Windows主机(使用NSClient++ plugin)
•可以指定自己编写的Plugin通过网络收集数据来监控任何情况(温度、警告……)
•可以通过配置Nagios远程执行插件远程执行脚本
•远程监控支持SSH或SSL加通道方式进行监控
•简单的plugin设计允许用户很容易的开发自己需要的检查服务,支持很多开发语言(shell scripts、C++、Perl、ruby、Python、PHP、C#等)
•包含很多图形化数据Plugins(Nagiosgraph、Nagiosgrapher、PNP4Nagios等)
•可并行服务检查
•能够定义网络主机的层次,允许逐级检查,就是从父主机开始向下检查
•当服务或主机出现问题时发出通告,可通过email, pager, sms 或任意用户自定义的plugin进行通知
•能够自定义事件处理机制重新激活出问题的服务或主机
•自动日志循环
•支持冗余监控
•包括Web界面可以查看当前网络状态,通知,问题历史,日志文件等
二、Nagios工作原理
Nagios的功能是监控服务和主机,但是他自身并不包括这部分功能,所有的监控、检测功能都是通过各种插件来完成的。
启动Nagios后,它会周期性的自动调用插件去检测服务器状态,同时Nagios会维持一个队列,所有插件返回来的状态信息都进入队列,Nagios每次都从队首开始读取信息,并进行处理后,把状态结果通过web显示出来。
Nagios提供了许多插件,利用这些插件可以方便的监控很多服务状态。安装完成后,在nagios主目录下的/libexec里放有nagios自带的可以使用的所有插件,如,check_disk是检查磁盘空间的插件,check_load是检查CPU负载的,等等。每一个插件可以通过运行./check_xxx –h 来查看其使用方法和功能。
Nagios可以识别4种状态返回信息,即
0(OK)表示状态正常/绿色、
1(WARNING)表示出现警告/黄色、
2(CRITICAL)表示出现非常严重的错误/红色、
3(UNKNOWN)表示未知错误/深黄色。Nagios根据插件返回来的值,来判断监控对象的状态,并通过web显示出来,以供管理员及时发现故障。
四种监控状态:
状态 代码 颜色
正常 OK 绿色
警告 WARNING 黄色
严重 CRITICAL 红色
未知错误 UNKOWN 深黄色
再说报警功能,如果监控系统发现问题不能报警那就没有意义了,所以报警也是nagios很重要的功能之一。但是,同样的,Nagios 自身也没有报警部分的代码,甚至没有插件,而是交给用户或者其他相关开源项目组去完成的。
Nagios 安装,是指基本平台,也就是Nagios软件包的安装。它是监控体系的框架,也是所有监控的基础。
打开Nagios官方的文档,会发现Nagios基本上没有什么依赖包,只要求系统是Linux或者其他Nagios支持的系统。不过如果你没有安装apache(http服务),那么你就没有那么直观的界面来查看监控信息了,所以apache姑且算是一个前提条件。关于apache的安装,网上有很多,照着安装就是了。安装之后要检查一下是否可以正常工作。
知道Nagios 是如何通过插件来管理服务器对象后,现在开始研究它是如何管理远端服务器对象的。Nagios 系统提供了一个插件NRPE。Nagios 通过周期性的运行它来获得远端服务器的各种状态信息。它们之间的关系如下图所示:
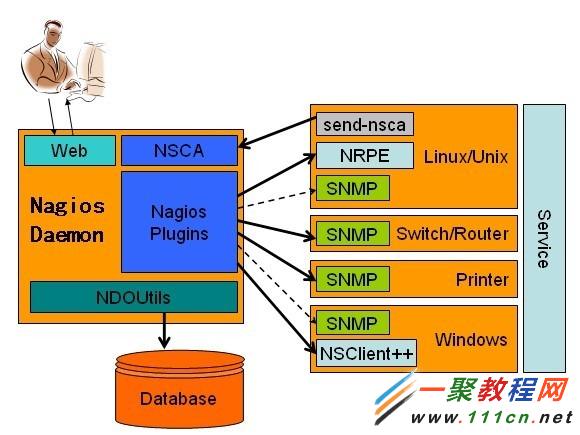
Nagios 通过NRPE 来远端管理服务
1. Nagios 执行安装在它里面的check_nrpe 插件,并告诉check_nrpe 去检测哪些服务。
2. 通过SSL,check_nrpe 连接远端机子上的NRPE daemon
3. NRPE 运行本地的各种插件去检测本地的服务和状态(check_disk,..etc)
4. 最后,NRPE 把检测的结果传给主机端的check_nrpe,check_nrpe 再把结果送到Nagios状态队列中。
5. Nagios 依次读取队列中的信息,再把结果显示出来。
三、实验环境
----------------------------------------------------------------------------------
Host Name | Sysctm OS | IP | Software
----------------------------------------------------------------------------------
Nagios-Server CentOS release 6.3 (Final) 192.168.10.11 Apache or Nginx、Php、Nagios、nagios-plugins
Nagios-Linux CentOS release 5.8 (Final) 192.168.10.12 nagios-plugins、nrpe
Nagios-Windows Windows server2003 192.168.10.13 nscp
----------------------------------------------------------------------------------
Server 安装了nagios软件,对监控的数据做处理,并且提供web界面查看和管理。当然也可以对本机自身的信息进行监控。
Client 安装了NRPE等客户端,根据监控机的请求执行监控,然后将结果回传给监控机。
防火墙已关闭/iptables: Firewall is not running.
SELINUX=disabled
四、实验目标

五、Nagios-Server服务端安装
5.1 基础支持套件:gcc glibc glibc-common gd gd-devel xinetd openssl-devel
[root@Nagios-Server /]# rpm -q gcc glibc glibc-common gd gd-devel xinetd openssl-devel
如果系统中没有这些套件,使用yum 安装
[root@Nagios-Server /]# yum install -y gcc glibc glibc-common gd gd-devel xinetd openssl-devel
5.2 创建nagios用户和用户组
[root@Nagios-Server /]# useradd -s /sbin/nologin nagios
[root@Nagios-Server /]# mkdir /usr/local/nagios
[root@Nagios-Server /]# chown -R nagios.nagios /usr/local/nagios
5.3 编译安装Nagios
Nagios 官网
http://www.nagios.org/download
[root@Nagios-Server src]# wget http://prdownloads.sourceforge.net/sourceforge/nagios/nagios-4.0.2.tar.gz
[root@Nagios-Server src]# tar zxvf nagios-4.0.2.tar.gz
[root@Nagios-Server src]# cd nagios-4.0.2
[root@Nagios-Server nagios-4.0.2]# ./configure --prefix=/usr/local/nagios
Creating sample config files in sample-config/ ...
*** Configuration summary for nagios 4.0.2 11-25-2013 ***:
General Options:
-------------------------
Nagios executable: nagios
Nagios user/group: nagios,nagios
Command user/group: nagios,nagios
Event Broker: yes
Install ${prefix}: /usr/local/nagios
Install ${includedir}: /usr/local/nagios/include/nagios
Lock file: ${prefix}/var/nagios.lock
Check result directory: ${prefix}/var/spool/checkresults
Init directory: /etc/rc.d/init.d
Apache conf.d directory: /etc/httpd/conf.d
Mail program: /bin/mail
Host OS: linux-gnu
IOBroker Method: epoll
Web Interface Options:
------------------------
HTML URL: http://localhost/nagios/
CGI URL: http://localhost/nagios/cgi-bin/
Traceroute (used by WAP): /bin/traceroute
Review the options above for accuracy. If they look okay,
type 'make all' to compile the main program and CGIs.
[root@Nagios-Server nagios-4.0.2]# make all
*** Compile finished ***
If the main program and CGIs compiled without any errors, you
can continue with installing Nagios as follows (type 'make'
without any arguments for a list of all possible options):
make install
- This installs the main program, CGIs, and HTML files
make install-init
- This installs the init script in /etc/rc.d/init.d
make install-commandmode
- This installs and configures permissions on the
directory for holding the external command file
make install-config
- This installs *SAMPLE* config files in /usr/local/nagios/etc
You'll have to modify these sample files before you can
use Nagios. Read the HTML documentation for more info
on doing this. Pay particular attention to the docs on
object configuration files, as they determine what/how
things get monitored!
make install-webconf
- This installs the Apache config file for the Nagios
web interface
make install-exfoliation
- This installs the Exfoliation theme for the Nagios
web interface
make install-classicui
- This installs the classic theme for the Nagios
web interface
*** Support Notes *******************************************
If you have questions about configuring or running Nagios,
please make sure that you:
- Look at the sample config files
- Read the documentation on the Nagios Library at:
http://library.nagios.com
before you post a question to one of the mailing lists.
Also make sure to include pertinent information that could
help others help you. This might include:
- What version of Nagios you are using
- What version of the plugins you are using
- Relevant snippets from your config files
- Relevant error messages from the Nagios log file
For more information on obtaining support for Nagios, visit:
http://support.nagios.com
*************************************************************
Enjoy.
[root@Nagios-Server nagios-4.0.2]# make install
*** Exfoliation theme installed ***
NOTE: Use 'make install-classicui' to revert to classic Nagios theme
make[1]: Leaving directory `/usr/local/src/nagios-4.0.2'
make install-basic
make[1]: Entering directory `/usr/local/src/nagios-4.0.2'
/usr/bin/install -c -m 775 -o nagios -g nagios -d /usr/local/nagios/libexec
/usr/bin/install -c -m 775 -o nagios -g nagios -d /usr/local/nagios/var
/usr/bin/install -c -m 775 -o nagios -g nagios -d /usr/local/nagios/var/archives
/usr/bin/install -c -m 775 -o nagios -g nagios -d /usr/local/nagios/var/spool/checkresults
*** Main program, CGIs and HTML files installed ***
You can continue with installing Nagios as follows (type 'make'
without any arguments for a list of all possible options):
make install-init
- This installs the init script in /etc/rc.d/init.d
make install-commandmode
- This installs and configures permissions on the
directory for holding the external command file
make install-config
- This installs sample config files in /usr/local/nagios/etc
make[1]: Leaving directory `/usr/local/src/nagios-4.0.2'
[root@Nagios-Server nagios-4.0.2]# make install-init
/usr/bin/install -c -m 755 -d -o root -g root /etc/rc.d/init.d
/usr/bin/install -c -m 755 -o root -g root daemon-init /etc/rc.d/init.d/nagios
*** Init script installed ***
[root@Nagios-Server nagios-4.0.2]# make install-commandmode
/usr/bin/install -c -m 775 -o nagios -g nagios -d /usr/local/nagios/var/rw
chmod g+s /usr/local/nagios/var/rw
*** External command directory configured ***
[root@Nagios-Server nagios-4.0.2]# make install-config
/usr/bin/install -c -m 775 -o nagios -g nagios -d /usr/local/nagios/etc
/usr/bin/install -c -m 775 -o nagios -g nagios -d /usr/local/nagios/etc/objects
/usr/bin/install -c -b -m 664 -o nagios -g nagios sample-config/nagios.cfg /usr/local/nagios/etc/nagios.cfg
/usr/bin/install -c -b -m 664 -o nagios -g nagios sample-config/cgi.cfg /usr/local/nagios/etc/cgi.cfg
/usr/bin/install -c -b -m 660 -o nagios -g nagios sample-config/resource.cfg /usr/local/nagios/etc/resource.cfg
/usr/bin/install -c -b -m 664 -o nagios -g nagios sample-config/template-object/templates.cfg /usr/local/nagios/etc/objects/templates.cfg
/usr/bin/install -c -b -m 664 -o nagios -g nagios sample-config/template-object/commands.cfg /usr/local/nagios/etc/objects/commands.cfg
/usr/bin/install -c -b -m 664 -o nagios -g nagios sample-config/template-object/contacts.cfg /usr/local/nagios/etc/objects/contacts.cfg
/usr/bin/install -c -b -m 664 -o nagios -g nagios sample-config/template-object/timeperiods.cfg /usr/local/nagios/etc/objects/timeperiods.cfg
/usr/bin/install -c -b -m 664 -o nagios -g nagios sample-config/template-object/localhost.cfg /usr/local/nagios/etc/objects/localhost.cfg
/usr/bin/install -c -b -m 664 -o nagios -g nagios sample-config/template-object/windows.cfg /usr/local/nagios/etc/objects/windows.cfg
/usr/bin/install -c -b -m 664 -o nagios -g nagios sample-config/template-object/printer.cfg /usr/local/nagios/etc/objects/printer.cfg
/usr/bin/install -c -b -m 664 -o nagios -g nagios sample-config/template-object/switch.cfg /usr/local/nagios/etc/objects/switch.cfg
*** Config files installed ***
Remember, these are *SAMPLE* config files. You'll need to read
the documentation for more information on how to actually define
services, hosts, etc. to fit your particular needs.
[root@Nagios-Server nagios-4.0.2]# chkconfig --add nagios
[root@Nagios-Server nagios-4.0.2]# chkconfig --level 35 nagios on
[root@Nagios-Server nagios-4.0.2]# chkconfig --list nagios
5.4 验证程序是否被正确安装
切换目录到安装路径(这里是/usr/local/nagios),看是否存在etc、bin、sbin、share、var 这五个目录,如果存在则可以表明程序被正确的安装到系统了。Nagios 各个目录用途说明如下:
bin ----> Nagios 可执行程序所在目录
etc ----> Nagios 配置文件所在目录
sbin ----> Nagios CGI 文件所在目录,也就是执行外部命令所需文件所在的目录
share ----> Nagios网页文件所在的目录
libexec ----> Nagios 外部插件所在目录
var ----> Nagios 日志文件、lock 等文件所在的目录
var/archives ----> Nagios 日志自动归档目录
var/rw ----> 用来存放外部命令文件的目录
5.5 安装Nagios 插件
[root@Nagios-Server nagios-4.0.2]# cd /usr/local/src
[root@Nagios-Server src]# wget http://assets.nagios.com/downloads/nagiosplugins/nagios-plugins-1.5.tar.gz
[root@Nagios-Server src]# tar zxvf nagios-plugins-1.5.tar.gz
[root@Nagios-Server src]# cd nagios-plugins-1.5
[root@Nagios-Server nagios-plugins-1.5]# ./configure --prefix=/usr/local/nagios
configure: creating ./config.status
config.status: creating gl/Makefile
config.status: creating nagios-plugins.spec
config.status: creating Makefile
config.status: creating tap/Makefile
config.status: creating lib/Makefile
config.status: creating plugins/Makefile
config.status: creating lib/tests/Makefile
config.status: creating plugins-root/Makefile
config.status: creating plugins-scripts/Makefile
config.status: creating plugins-scripts/subst
config.status: creating plugins-scripts/utils.pm
config.status: creating plugins-scripts/utils.sh
config.status: creating perlmods/Makefile
config.status: creating test.pl
config.status: creating pkg/solaris/pkginfo
config.status: creating po/Makefile.in
config.status: creating config.h
config.status: executing depfiles commands
config.status: executing libtool commands
config.status: executing po-directories commands
config.status: creating po/POTFILES
config.status: creating po/Makefile
--with-apt-get-command:
--with-ping6-command: /bin/ping6 -n -U -w %d -c %d %s
--with-ping-command: /bin/ping -n -U -w %d -c %d %s
--with-ipv6: yes
--with-mysql: /usr/local/mysql/bin/mysql_config
--with-openssl: yes
--with-gnutls: no
--enable-extra-opts: no
--with-perl: /usr/bin/perl
--enable-perl-modules: no
--with-cgiurl: /nagios/cgi-bin
--with-trusted-path: /bin:/sbin:/usr/bin:/usr/sbin
--enable-libtap: no
[root@Nagios-Server nagios-plugins-1.5]# make && make install
make[2]: Nothing to be done for `install-data-am'.
make[2]: Leaving directory `/usr/local/src/nagios-plugins-1.5/plugins-scripts'
make[1]: Leaving directory `/usr/local/src/nagios-plugins-1.5/plugins-scripts'
Making install in plugins-root
make[1]: Entering directory `/usr/local/src/nagios-plugins-1.5/plugins-root'
make[2]: Entering directory `/usr/local/src/nagios-plugins-1.5/plugins-root'
/usr/bin/install -c check_dhcp /usr/local/nagios/libexec/check_dhcp
chown root /usr/local/nagios/libexec/check_dhcp
chmod ug=rx,u+s /usr/local/nagios/libexec/check_dhcp
/usr/bin/install -c check_icmp /usr/local/nagios/libexec/check_icmp
chown root /usr/local/nagios/libexec/check_icmp
chmod ug=rx,u+s /usr/local/nagios/libexec/check_icmp
make[2]: Nothing to be done for `install-data-am'.
make[2]: Leaving directory `/usr/local/src/nagios-plugins-1.5/plugins-root'
make[1]: Leaving directory `/usr/local/src/nagios-plugins-1.5/plugins-root'
Making install in po
make[1]: Entering directory `/usr/local/src/nagios-plugins-1.5/po'
/bin/mkdir -p /usr/local/nagios/share
installing fr.gmo as /usr/local/nagios/share/locale/fr/LC_MESSAGES/nagios-plugins.mo
installing de.gmo as /usr/local/nagios/share/locale/de/LC_MESSAGES/nagios-plugins.mo
if test "nagios-plugins" = "gettext-tools"; then
/bin/mkdir -p /usr/local/nagios/share/gettext/po;
for file in Makefile.in.in remove-potcdate.sin Makevars.template; do
/usr/bin/install -c -m 644 ./$file
/usr/local/nagios/share/gettext/po/$file;
done;
for file in Makevars; do
rm -f /usr/local/nagios/share/gettext/po/$file;
done;
else
: ;
fi
make[1]: Leaving directory `/usr/local/src/nagios-plugins-1.5/po'
make[1]: Entering directory `/usr/local/src/nagios-plugins-1.5'
make[2]: Entering directory `/usr/local/src/nagios-plugins-1.5'
make[2]: Nothing to be done for `install-exec-am'.
make[2]: Nothing to be done for `install-data-am'.
make[2]: Leaving directory `/usr/local/src/nagios-plugins-1.5'
make[1]: Leaving directory `/usr/local/src/nagios-plugins-1.5
5.6 安装 web 环境(apache nginx) 及 Php
此处省略 可以参考
------------------------------------------------------------------------
CentOS 6.2编译安装Nginx1.2.6+MySQL5.5.28+PHP5.3.20
http://blog.rekfan.com/articles/141.html
Nginx支持Perl、Java的安装与配置
http://blog.rekfan.com/articles/393.html
------------------------------------------------------------------------
apache 配置文件httpd.conf :
#setting for nagios
ScriptAlias /nagios/cgi-bin "/usr/local/nagios/sbin"
<Directory "/usr/local/nagios/sbin">
AuthType Basic
Options ExecCGI
AllowOverride None
Order allow,deny
Allow from all
AuthName "Nagios Access"
AuthUserFile /usr/local/nagios/etc/htpasswd //用于此目录访问身份验证的文件
Require valid-user
</Directory>
Alias /nagios "/usr/local/nagios/share"
<Directory "/usr/local/nagios/share">
AuthType Basic
Options None
AllowOverride None
Order allow,deny
Allow from all
AuthName "nagios Access"
AuthUserFile /usr/local/nagios/etc/htpasswd
Require valid-user
</Directory>
nginx 配置文件rekfan_nagios.conf :
server {
listen 80;
server_name nagios.rekfan.com;
#charset koi8-r;
#access_log logs/host.access.log main;
location / {
root /usr/local/nagios/share;
index index.html index.htm index.shtml index.php ;
}
error_page 404 /404.html;
location /nagios {
alias /usr/local/nagios/share;
}
location /cgi-bin/images {
alias /usr/local/nagios/share/images;
}
location /cgi-bin/stylesheets {
alias /usr/local/nagios/share/stylesheets;
}
location /cgi-bin {
alias /usr/local/nagios/sbin;
}
location ~ .php$ {
root /usr/local/nagios/share;
fastcgi_pass 127.0.0.1:9000;
fastcgi_index index.php;
fastcgi_param SCRIPT_FILENAME $document_root$fastcgi_script_name;
include fastcgi_params;
}
location ~ .(cgi|pl)?$ {
root /usr/local/nagios/sbin;
rewrite ^/nagios/cgi-bin/(.*).cgi /$1.cgi break;
fastcgi_pass unix:/usr/local/nginx/logs/nginx-fcgi.sock;
fastcgi_index index.cgi;
fastcgi_param SCRIPT_FILENAME $document_root$fastcgi_script_name;
include fastcgi_params;
}
}
六、配置Nagios [Nagios-Server]
Nagios 主要用于监控一台或者多台本地主机及远程的各种信息,包括本机资源及对外的服务等。默认的Nagios 配置没有任何监控内容,仅是一些模板文件。若要让Nagios 提供服务,就必须修改配置文件,增加要监控的主机和服务,下面将详细介绍。
6.1 默认配置文件介绍
Nagios 安装完毕后,默认的配置文件在/usr/local/nagios/etc目录下。
每个文件或目录含义如下表所示:
---------------------------------------------------------------------------------
文件名或目录名 | 用途
---------------------------------------------------------------------------------
cgi.cfg 控制CGI访问的配置文件
nagios.cfg Nagios 主配置文件
resource.cfg 变量定义文件,又称为资源文件,在些文件中定义变量,以便由其他配置文件引用,如$USER1$
objects objects 是一个目录,在此目录下有很多配置文件模板,用于定义Nagios 对象
objects/commands.cfg 命令定义配置文件,其中定义的命令可以被其他配置文件引用
objects/contacts.cfg 定义联系人和联系人组的配置文件
objects/localhost.cfg 定义监控本地主机的配置文件
objects/printer.cfg 定义监控打印机的一个配置文件模板,默认没有启用此文件
objects/switch.cfg 定义监控路由器的一个配置文件模板,默认没有启用此文件
objects/templates.cfg 定义主机和服务的一个模板配置文件,可以在其他配置文件中引用
objects/timeperiods.cfg 定义Nagios 监控时间段的配置文件
objects/windows.cfg 监控Windows 主机的一个配置文件模板,默认没有启用此文件
---------------------------------------------------------------------------------
6.2 配置文件之间的关系
在nagios的配置过程中涉及到的几个定义有:主机、主机组,服务、服务组,联系人、联系人组,监控时间,监控命令等,从这些定义可以看出,nagios各个配置文件之间是互为关联,彼此引用的。
成功配置出一台nagios监控系统,必须要弄清楚每个配置文件之间依赖与被依赖的关系,最重要的有四点:
第一:定义监控哪些主机、主机组、服务和服务组;
第二:定义这个监控要用什么命令实现;
第三:定义监控的时间段;
第四:定义主机或服务出现问题时要通知的联系人和联系人组。
6.3 配置Nagios
为了能更清楚的说明问题,同时也为了维护方便,建议将nagios各个定义对象创建独立的配置文件:
• 创建hosts.cfg文件来定义主机和主机组
• 创建services.cfg文件来定义服务
• 用默认的contacts.cfg文件来定义联系人和联系人组
• 用默认的commands.cfg文件来定义命令
• 用默认的timeperiods.cfg来定义监控时间段
• 用默认的templates.cfg文件作为资源引用文件
a. templates.cfg文件
nagios主要用于监控主机资源以及服务,在nagios配置中称为对象,为了不必重复定义一些监控对象,Nagios引入了一个模板配置文件,将一些共性的属性定义成模板,以便于多次引用。这就是templates.cfg的作用。
下面详细介绍下templates.cfg文件中每个参数的含义:
expand source
b. resource.cfg文件
resource.cfg是nagios的变量定义文件,文件内容只有一行:
$USER1$=/usr/local/nagios/libexec
其中,变量$USER1$指定了安装nagios插件的路径,如果把插件安装在了其它路径,只需在这里进行修改即可。需要注意的是,变量必须先定义,然后才能在其它配置文件中进行引用。
c. commands.cfg文件
此文件默认是存在的,无需修改即可使用,当然如果有新的命令需要加入时,在此文件进行添加即可。
expand source
d. hosts.cfg文件
此文件默认不存在,需要手动创建,hosts.cfg主要用来指定被监控的主机地址以及相关属性信息,根据实验目标配置如下:
define host{
use linux-server #引用主机linux-server的属性信息,linux-server主机在templates.cfg文件中进行了定义。
host_name Nagios-Linux #主机名
alias Nagios-Linux #主机别名
address 192.168.10.12 #被监控的主机地址,这个地址可以是ip,也可以是域名。
}
#定义一个主机组
define hostgroup{
hostgroup_name bsmart-servers #主机组名称,可以随意指定。
alias bsmart servers #主机组别名
members Nagios-Linux #主机组成员,其中“Nagios-Linux”就是上面定义的主机。
}
注意:在/usr/local/nagios/etc/objects 下默认有localhost.cfg 和windows.cfg 这两个配置文件,localhost.cfg 文件是定义监控主机本身的,windows.cfg 文件是定义windows 主机的,其中包括了对host 和相关services 的定义。所以在本次实验中,将直接在localhost.cfg 中定义监控主机(Nagios-Server),在windows.cfg中定义windows 主机(Nagios-Windows)。根据自己的需要修改其中的相关配置,详细如下:
localhost.cfg
define host{
use linux-server ; Name of host template to use
; This host definition will inherit all variables that are defined
; in (or inherited by) the linux-server host template definition.
host_name Nagios-Server
alias Nagios-Server
address 127.0.0.1
}
define hostgroup{
hostgroup_name linux-servers ; The name of the hostgroup
alias Linux Servers ; Long name of the group
members Nagios-Server ; Comma separated list of hosts that belong to this group
}
define service{
use local-service ; Name of service template to use
host_name Nagios-Server
service_description PING
check_command check_ping!100.0,20%!500.0,60%
}
define service{
use local-service ; Name of service template to use
host_name Nagios-Server
service_description Root Partition
check_command check_local_disk!20%!10%!/
}
define service{
use local-service ; Name of service template to use
host_name Nagios-Server
service_description Current Users
check_command check_local_users!20!50
}
define service{
use local-service ; Name of service template to use
host_name Nagios-Server
service_description Total Processes
check_command check_local_procs!250!400!RSZDT
}
define service{
use local-service ; Name of service template to use
host_name Nagios-Server
service_description Current Load
check_command check_local_load!5.0,4.0,3.0!10.0,6.0,4.0
}
define service{
use local-service ; Name of service template to use
host_name Nagios-Server
service_description Swap Usage
check_command check_local_swap!20!10
}
define service{
use local-service ; Name of service template to use
host_name Nagios-Server
service_description SSH
check_command check_ssh
notifications_enabled 0
}
define service{
use local-service ; Name of service template to use
host_name Nagios-Server
service_description HTTP
check_command check_http
notifications_enabled 0
}
windows.cfg
define host{
use windows-server ; Inherit default values from a template
host_name Nagios-Windows ; The name we're giving to this host
alias My Windows Server ; A longer name associated with the host
address 192.168.10.13 ; IP address of the host
}
define hostgroup{
hostgroup_name windows-servers ; The name of the hostgroup
alias Windows Servers ; Long name of the group
}
define service{
use generic-service
host_name Nagios-Windows
service_description NSClient++ Version
check_command check_nt!CLIENTVERSION
}
define service{
use generic-service
host_name Nagios-Windows
service_description Uptime
check_command check_nt!UPTIME
}
define service{
use generic-service
host_name Nagios-Windows
service_description CPU Load
check_command check_nt!CPULOAD!-l 5,80,90
}
define service{
use generic-service
host_name Nagios-Windows
service_description Memory Usage
check_command check_nt!MEMUSE!-w 80 -c 90
}
define service{
use generic-service
host_name Nagios-Windows
service_description C: Drive Space
check_command check_nt!USEDDISKSPACE!-l c -w 80 -c 90
}
define service{
use generic-service
host_name Nagios-Windows
service_description W3SVC
check_command check_nt!SERVICESTATE!-d SHOWALL -l W3SVC
}
define service{
use generic-service
host_name Nagios-Windows
service_description Explorer
check_command check_nt!PROCSTATE!-d SHOWALL -l Explorer.exe
}
e. services.cfg文件
此文件默认也不存在,需要手动创建,services.cfg文件主要用于定义监控的服务和主机资源,例如监控http服务、ftp服务、主机磁盘空间、主机系统负载等等。Nagios-Server 和Nagios-Windows 相关服务已在相应的配置文件中定义,所以这里只需要定义Nagios-Linux 相关服务即可,这里只定义一个检测是否存活的服务来验证配置文件的正确性,其他服务的定义将在后面讲到。
define contact{
contact_name David #联系人的名称,这个地方不要有空格
use generic-contact #引用generic-contact的属性信息,其中“generic-contact”在templates.cfg文件中进行定义
alias Nagios Admin
email david.tang@bsmart.cn
}
define contactgroup{
contactgroup_name ts #联系人组的名称,同样不能空格
alias Technical Support #联系人组描述
members David #联系人组成员,其中“david”就是上面定义的联系人,如果有多个联系人则以逗号相隔
}
g. timeperiods.cfg文件
此文件只要用于定义监控的时间段,下面是一个配置好的实例:
#下面是定义一个名为24x7的时间段,即监控所有时间段
define timeperiod{
timeperiod_name 24x7 #时间段的名称,这个地方不要有空格
alias 24 Hours A Day, 7 Days A Week
sunday 00:00-24:00
monday 00:00-24:00
tuesday 00:00-24:00
wednesday 00:00-24:00
thursday 00:00-24:00
friday 00:00-24:00
saturday 00:00-24:00
}
#下面是定义一个名为workhours的时间段,即工作时间段。
define timeperiod{
timeperiod_name workhours
alias Normal Work Hours
monday 09:00-17:00
tuesday 09:00-17:00
wednesday 09:00-17:00
thursday 09:00-17:00
friday 09:00-17:00
}
h. cgi.cfg文件
此文件用来控制相关cgi脚本,如果想在nagios的web监控界面执行cgi脚本,例如重启nagios进程、关闭nagios通知、停止nagios主机检测等,这时就需要配置cgi.cfg文件了。
由于nagios的web监控界面验证用户为david,所以只需在cgi.cfg文件中添加此用户的执行权限就可以了,需要修改的配置信息如下:
default_user_name=david
authorized_for_system_information=nagiosadmin,david
authorized_for_configuration_information=nagiosadmin,david
authorized_for_system_commands=david
authorized_for_all_services=nagiosadmin,david
authorized_for_all_hosts=nagiosadmin,david
authorized_for_all_service_commands=nagiosadmin,david
authorized_for_all_host_commands=nagiosadmin,david
i. nagios.cfg文件
nagios.cfg默认的路径为/usr/local/nagios/etc/nagios.cfg,是nagios的核心配置文件,所有的对象配置文件都必须在这个文件中进行定义才能发挥其作用,这里只需将对象配置文件在Nagios.cfg文件中进行引用即可。
log_file=/usr/local/nagios/var/nagios.log # 定义nagios日志文件的路径
cfg_file=/usr/local/nagios/etc/objects/commands.cfg # “cfg_file”变量用来引用对象配置文件,如果有更多的对象配置文件,在这里依次添加即可。
cfg_file=/usr/local/nagios/etc/objects/contacts.cfg
cfg_file=/usr/local/nagios/etc/objects/hosts.cfg
cfg_file=/usr/local/nagios/etc/objects/services.cfg
cfg_file=/usr/local/nagios/etc/objects/timeperiods.cfg
cfg_file=/usr/local/nagios/etc/objects/templates.cfg
cfg_file=/usr/local/nagios/etc/objects/localhost.cfg # 本机配置文件
cfg_file=/usr/local/nagios/etc/objects/windows.cfg # windows 主机配置文件
object_cache_file=/usr/local/nagios/var/objects.cache # 该变量用于指定一个“所有对象配置文件”的副本文件,或者叫对象缓冲文件
precached_object_file=/usr/local/nagios/var/objects.precache
resource_file=/usr/local/nagios/etc/resource.cfg # 该变量用于指定nagios资源文件的路径,可以在nagios.cfg中定义多个资源文件。
status_file=/usr/local/nagios/var/status.dat # 该变量用于定义一个状态文件,此文件用于保存nagios的当前状态、注释和宕机信息等。
status_update_interval=10 # 该变量用于定义状态文件(即status.dat)的更新时间间隔,单位是秒,最小更新间隔是1秒。
nagios_user=nagios # 该变量指定了Nagios进程使用哪个用户运行。
nagios_group=nagios # 该变量用于指定Nagios使用哪个用户组运行。
check_external_commands=1 # 该变量用于设置是否允许nagios在web监控界面运行cgi命令;
# 也就是是否允许nagios在web界面下执行重启nagios、停止主机/服务检查等操作;
# “1”为运行,“0”为不允许。
command_check_interval=10s # 该变量用于设置nagios对外部命令检测的时间间隔,如果指定了一个数字加一个"s"(如10s);
# 那么外部检测命令的间隔是这个数值以秒为单位的时间间隔;
# 如果没有用"s",那么外部检测命令的间隔是以这个数值的“时间单位”的时间间隔。
interval_length=60 # 该变量指定了nagios的时间单位,默认值是60秒,也就是1分钟;
# 即在nagios配置中所有的时间单位都是分钟。
6.4 验证Nagios 配置文件的正确性
Nagios 在验证配置文件方面做的非常到位,只需通过一个命令即可完成:
[root@Nagios-Server /]# /usr/local/nagios/bin/nagios -v /usr/local/nagios/etc/nagios.cfg
Nagios Core 4.0.2
Copyright (c) 2009-present Nagios Core Development Team and Community Contributors
Copyright (c) 1999-2009 Ethan Galstad
Last Modified: 11-25-2013
License: GPL
Website: http://www.nagios.org
Reading configuration data...
Read main config file okay...
Read object config files okay...
Running pre-flight check on configuration data...
Checking objects...
Checked 15 services.
Checked 2 hosts.
Checked 2 host groups.
Checked 0 service groups.
Checked 1 contacts.
Checked 1 contact groups.
Checked 25 commands.
Checked 5 time periods.
Checked 0 host escalations.
Checked 0 service escalations.
Checking for circular paths...
Checked 2 hosts
Checked 0 service dependencies
Checked 0 host dependencies
Checked 5 timeperiods
Checking global event handlers...
Checking obsessive compulsive processor commands...
Checking misc settings...
Total Warnings: 0
Total Errors: 0
Things look okay - No serious problems were detected during the pre-flight check
Nagios提供的这个验证功能非常有用,在错误信息中通常会打印出错误的配置文件以及文件中的哪一行,这使得nagios的配置变得非常容易,报警信息通常是可以忽略的,因为一般那些只是建议性的。
看到上面这些信息就说明没问题了,然后启动Nagios 服务。
七、Nagios的启动与停止
7.1 启动Nagios
a. 通过初始化脚本启动nagios
[root@Nagios-Server /]# /etc/init.d/nagios start
or
[root@Nagios-Server /]# service nagios start
b. 手工方式启动nagios
通过nagios命令的“-d”参数来启动nagios守护进程:
[root@Nagios-Server /]# /usr/local/nagios/bin/nagios -d /usr/local/nagios/etc/nagios.cfg
7.2 重启Nagios
当修改了配置文件让其生效时,需要重启/重载Nagios服务。
a. 通过初始化脚本来重启nagios
[root@Nagios-Server /]# /etc/init.d/nagios reload
or
[root@Nagios-Server /]# /etc/init.d/nagios restart
or
[root@Nagios-Server /]# service nagios restart
b. 通过web监控页重启nagios
可以通过web监控页的 "Process Info" -> "Restart the Nagios process"来重启nagios
c. 手工方式平滑重启
[root@Nagios-Server /]# kill -HUP <nagios_pid>
7.3 停止Nagios
a. 通过初始化脚本关闭nagios服务
[root@Nagios-Server /]# /etc/init.d/nagios stop
or
[root@Nagios-Server /]# service nagios stop
b. 通过web监控页停止nagios
可以通过web监控页的 "Process Info" -> "Shutdown the Nagios process"来停止nagios
c. 手工方式停止Nagios
[root@Nagios-Server /]# kill <nagios_pid>
八、查看初步配置情况
8.1 启动完成之后,登录Nagios Web监控页http://192.168.10.11/nagios/ 查看相关信息。
8.2 点击左面的Current Status -> Hosts 可以看到所定义的三台主机已经全部UP了。
8.3 点击Current Status -> Services 查看服务监控情况。
看到Nagios-Linux和Nagios-Server的服务状态已经OK了,但是Nagios-Windows的服务状态为CRITICAL,Status Information 提示Connection refused。因为Nagios-Windows上还未安装插件,内部服务还无法查看,所以出现这种情况。将在下面具体讲解。
九、利用NRPE监控远程Linux上的“本地信息”
上面已经对远程Linux 主机是否存活做了监控,而判断远程机器是否存活,我们可以使用ping 工具对其监测。还有一些远程主机服务,例如ftp、ssh、http,都是对外开放的服务,即使不用Nagios,我们也可以试的出来,随便找一台机器看能不能访问这些服务就行了。但是对于像磁盘容量,cpu负载这样的“本地信息”,Nagios只能监测自己所在的主机,而对其他的机器则显得有点无能为力。毕竟没得到被控主机的适当权限是不可能得到这些信息的。为了解决这个问题,nagios有这样一个附加组件--“NRPE”,用它就可以完成对Linux 类型主机"本地信息”的监控。
9.1 NRPE 工作原理
NRPE 总共由两部分组成:
•check_nrpe 插件,位于监控主机上
•NRPE daemon,运行在远程的Linux主机上(通常就是被监控机)
按照上图,整个的监控过程如下:
当Nagios 需要监控某个远程Linux 主机的服务或者资源情况时:
1.Nagios 会运行check_nrpe 这个插件,告诉它要检查什么;
2.check_nrpe 插件会连接到远程的NRPE daemon,所用的方式是SSL;
3.NRPE daemon 会运行相应的Nagios 插件来执行检查;
4.NRPE daemon 将检查的结果返回给check_nrpe 插件,插件将其递交给nagios做处理。
注意:NRPE daemon 需要Nagios 插件安装在远程的Linux主机上,否则,daemon不能做任何的监控。
9.2 在被监控机(Nagios-Linux)上
a. 增加用户&设定密码
[root@Nagios-Client src]# useradd nagios
[root@Nagios-Client src]# passwd nagios
b. 安装Nagios 插件
[root@Nagios-Client src]# tar zxvf nagios-plugins-1.5.tar.gz
[root@Nagios-Client src]# cd nagios-plugins-1.5
[root@Nagios-Client nagios-plugins-1.5]# ./configure --prefix=/usr/local/nagios
[root@Nagios-Client nagios-plugins-1.5]# make && make install
这一步完成后会在/usr/local/nagios/下生成三个目录include、libexec和share。
修改目录权限
[root@Nagios-Client nagios-plugins-1.5]# chown nagios.nagios /usr/local/nagios
[root@Nagios-Client nagios-plugins-1.5]# chown -R nagios.nagios /usr/local/nagios/libexec
c. 安装NRPE
[root@Nagios-Client nagios-plugins-1.5]# cd /usr/local/src
[root@Nagios-Client src]# wget http://sourceforge.net/projects/nagios/files/nrpe-2.x/nrpe-2.15/nrpe-2.15.tar.gz/download
[root@Nagios-Client src]# tar zxvf nrpe-2.15.tar.gz
[root@Nagios-Client src]# cd nrpe-2.15
[root@Nagios-Client nrpe-2.15]# ./configure
*** Configuration summary for nrpe 2.15 09-06-2013 ***:
General Options:
-------------------------
NRPE port: 5666
NRPE user: nagios
NRPE group: nagios
Nagios user: nagios
Nagios group: nagios
Review the options above for accuracy. If they look okay,
type 'make all' to compile the NRPE daemon and client.
[root@Nagios-Server nrpe-2.15]# make all
*** Compile finished ***
If the NRPE daemon and client compiled without any errors, you
can continue with the installation or upgrade process.
Read the PDF documentation (NRPE.pdf) for information on the next
steps you should take to complete the installation or upgrade.
接下来安装NPRE插件,daemon和示例配置文件。
c.1 安装check_nrpe 这个插件
[root@Nagios-Client nrpe-2.15]# make install-plugin
cd ./src/ && make install-plugin
make[1]: Entering directory `/usr/local/src/nrpe-2.15/src'
/usr/bin/install -c -m 775 -o nagios -g nagios -d /usr/local/nagios/libexec
/usr/bin/install -c -m 775 -o nagios -g nagios check_nrpe /usr/local/nagios/libexec
make[1]: Leaving directory `/usr/local/src/nrpe-2.15/src'
监控机需要安装check_nrpe 这个插件,被监控机并不需要,我们在这里安装它只是为了测试目的。
c.2 安装deamon
[root@Nagios-Client nrpe-2.15]# make install-daemon
cd ./src/ && make install-daemon
make[1]: Entering directory `/usr/local/src/nrpe-2.15/src'
/usr/bin/install -c -m 775 -o nagios -g nagios -d /usr/local/nagios/bin
/usr/bin/install -c -m 775 -o nagios -g nagios nrpe /usr/local/nagios/bin
make[1]: Leaving directory `/usr/local/src/nrpe-2.15/src'
c.3 安装配置文件
[root@Nagios-Client nrpe-2.15]# make install-daemon-config
/usr/bin/install -c -m 775 -o nagios -g nagios -d /usr/local/nagios/etc
/usr/bin/install -c -m 644 -o nagios -g nagios sample-config/nrpe.cfg /usr/local/nagios/etc
[root@Nagios-Client nrpe-2.15]#
现在再查看nagios 目录就会发现有5个目录了
按照安装文档的说明,是将NRPE deamon作为xinetd下的一个服务运行的。在这样的情况下xinetd就必须要先安装好,不过一般系统已经默认安装了。
如果没有安装
[root@Nagios-Client nrpe-2.15]# yum install -y xinetd
d. 安装xinted 脚本
[root@Nagios-Client nrpe-2.15]# make install-xinetd
可以看到创建了这个文件/etc/xinetd.d/nrpe。
编辑这个脚本/etc/xinetd.d/nrpe:
在only_from 后增加监控主机的IP地址。
编辑/etc/services 文件,增加NRPE服务,在最后添加一行
nrpe 5666/tcp # nrpe
重启xinted 服务
[root@Nagios-Client nrpe-2.15]# service xinetd restart
查看NRPE 是否已经启动
[root@Nagios-Client nrpe-2.15]# netstat -an|grep 5666
e. 测试NRPE是否则正常工作
使用上面在被监控机上安装的check_nrpe 这个插件测试NRPE 是否工作正常。
[root@Nagios-Client nrpe-2.15]# /usr/local/nagios/libexec/check_nrpe -H localhost
NRPE v2.15
会返回当前NRPE的版本
也就是在本地用check_nrpe连接nrpe daemon是正常的。
注:为了后面工作的顺利进行,注意本地防火墙要打开5666能让外部的监控机访问。
f. check_nrpe 命令用法
查看check_nrpe 命令用法
[root@Nagios-Client nrpe-2.15]# /usr/local/nagios/libexec/check_nrpe –h
可以看到用法是:
check_nrpe –H 被监控的主机 -c 要执行的监控命令
注意:-c 后面接的监控命令必须是nrpe.cfg 文件中定义的。也就是NRPE daemon只运行nrpe.cfg中所定义的命令。
g. 查看NRPE的监控命令
[root@Nagios-Client nrpe-2.15]# cd /usr/local/nagios/etc
[root@Nagios-Client etc]# cat nrpe.cfg |grep -v "^#"|grep -v "^$"
[root@Nagios-Client etc]# cat nrpe.cfg |grep -v "^#"|grep -v "^$"
log_facility=daemon
pid_file=/var/run/nrpe.pid
server_port=5666
nrpe_user=nagios
nrpe_group=nagios
allowed_hosts=127.0.0.1
dont_blame_nrpe=0
debug=0
command_timeout=60
connection_timeout=300
command[check_users]=/usr/local/nagios/libexec/check_users -w 5 -c 10
command[check_load]=/usr/local/nagios/libexec/check_load -w 15,10,5 -c 30,25,20
command[check_sda1]=/usr/local/nagios/libexec/check_disk -w 20% -c 10% -p /dev/sda1
command[check_zombie_procs]=/usr/local/nagios/libexec/check_procs -w 5 -c 10 -s Z
command[check_total_procs]=/usr/local/nagios/libexec/check_procs -w 150 -c 200
红色部分是命令名,也就是check_nrpe 的-c 参数可以接的内容,等号 “=” 后面是实际执行的插件程序(这与commands.cfg 中定义命令的形式十分相似,只不过是写在了一行)。也就是说check_users 就是等号后面/usr/local/nagios/libexec/check_users -w 5 -c 10 的简称。
我们可以很容易知道上面这5行定义的命令分别是检测登陆用户数,cpu负载,sda1的容量,僵尸进程,总进程数。各条命令具体的含义见插件用法(执行“插件程序名 –h”)。
由于-c 后面只能接nrpe.cfg 中定义的命令,也就是说现在我们只能用上面定义的这五条命令。
9.3 在监控主机(Nagios-Server)上
之前已经将Nagios运行起来了,现在要做的事情是:
•安装check_nrpe 插件;
•在commands.cfg 中创建check_nrpe 的命令定义,因为只有在commands.cfg 中定义过的命令才能在services.cfg 中使用;
•创建对被监控主机的监控项目;
9.3.1 安装check_nrpe 插件
[root@Nagios-Server src]# tar zxvf nrpe-2.15.tar.gz
[root@Nagios-Server src]# cd nrpe-2.15
[root@Nagios-Server nrpe-2.15]# ./configure
[root@Nagios-Server nrpe-2.15]# make all
[root@Nagios-Server nrpe-2.15]# make install-plugin
只运行这一步就行了,因为只需要check_nrpe插件。
在Nagios-Linux 上我们已经装好了nrpe,现在我们测试一下监控机使用check_nrpe 与被监控机运行的nrpe daemon之间的通信。
看到已经正确返回了NRPE的版本信息,说明一切正常。
9.3.2 在commands.cfg中增加对check_nrpe的定义
[root@Nagios-Server nrpe-2.15]# vi /usr/local/nagios/etc/objects/commands.cfg
在最后面增加如下内容:
# 'check_nrpe' command definition
define command{
command_name check_nrpe # 定义命令名称为check_nrpe,在services.cfg中要使用这个名称.
command_line $USER1$/check_nrpe -H $HOSTADDRESS$ -c $ARG1$ #这是定义实际运行的插件程序.
# 这个命令行的书写要完全按照check_nrpe这个命令的用法,不知道用法的就用check_nrpe –h查看.
}
-c 后面带的$ARG1$ 参数是传给nrpe daemon 执行的检测命令,之前说过了它必须是nrpe.cfg 中所定义的那5条命令中的其中一条。在services.cfg 中使用check_nrpe 的时候要用 “!” 带上这个参数。
9.3.3 定义对Nagios-Linux 主机的监控
下面就可以在services.cfg 中定义对Nagios-Linux 主机的监控了。
define service{
use local-service
host_name Nagios-Linux
service_description Current Load
check_command check_nrpe!check_load
}
define service{
use local-service
host_name Nagios-Linux
service_description Check Disk sda1
check_command check_nrpe!check_sda1
}
define service{
use local-service
host_name Nagios-Linux
service_description Total Processes
check_command check_nrpe!check_total_procs
}
define service{
use local-service
host_name Nagios-Linux
service_description Current Users
check_command check_nrpe!check_users
}
define service{
use local-service
host_name Nagios-Linux
service_description Check Zombie Procs
check_command check_nrpe!check_zombie_procs
}
还有一个任务是要监控Nagios-Linux 的swap 使用情况。但是在nrpe.cfg 中默认没有定义这个监控功能的命令。怎么办?手动在nrpe.cfg 中添加,也就是自定义NRPE命令。
现在我们要监控swap 分区,如果空闲空间小于20%则为警告状态 -> warning;如果小于10%则为严重状态 -> critical。我们可以查得需要使用check_swap插件,完整的命令行应该是下面这样。
[root@Nagios-Client /]# /usr/local/nagios/libexec/check_swap -w 20% -c 10%
在被监控机(Nagios-Linux)上增加check_swap 命令的定义
[root@Nagios-Client /]# vi /usr/local/nagios/etc/nrpe.cfg
增加下面这一行
command[check_swap]=/usr/local/nagios/libexec/check_swap -w 20% -c 10%
我们知道check_swap 现在就可以作为check_nrpe 的-c 的参数使用了
修改了配置文件,当然要重启。
如果你是以独立的daemon运行的nrpe,那么需要手动重启;如果你是在xinetd 下面运行的,则不需要。
由于本实验中nrpe 是xinetd 下运行的,所以不需要重启服务。
在监控机(Nagios-Server)上增加这个check_swap 监控项目
define service{
use local-service
host_name Nagios-Linux
service_description Check Swap
check_command check_nrpe!check_swap
}
同理,Nagios-Linux 上我还开启了http 服务,需要监控一下,按照上面的做法,在被监控机(Nagios-Linux)上增加check_http 命令的定义
[root@Nagios-Client /]# vi /usr/local/nagios/etc/nrpe.cfg
增加下面这一行
?
1
command[check_http]=/usr/local/nagios/libexec/check_http -I 127.0.0.1
在监控机(Nagios-Server)上增加check_http 监控项目
define service{
use local-service
host_name Nagios-Linux
service_description HTTP
check_command check_nrpe!check_http
}
所有的配置文件已经修改好了,现在重启Nagios。
[root@Nagios-Server /]# service nagios restart
9.3.4 查看配置情况
登录Nagios Web监控页http://192.168.10.11/nagios/ 查看相关信息。
可以看到,对于Nagios-Server 和Nagios-Linux 上的相关服务的监控已经成功了,还有Nagios-Windows 上的服务还没有定义,下面讲到。
十、利用NSCP监控远程Windows上的“本地信息”
在Nagios的libexec下有check_nt这个插件,它就是用来检查windows机器的服务的。其功能类似于check_nrpe。不过还需要搭配另外一个软件NSCP 3.0版本以前是NSClient++,它则类似于NRPE。
nscp是windows下nagios监控client的一个合集。其包含check plugins 、check_nt、check_nrpe 、nsca client 、wmi checks 。一般需要的监测项基本都包含在内了 。
一、安装
下载地址: http://nsclient.org/nscp/downloads ,直接下载下来的是msi包,注意系统版本(32位 64位) 。同windows下其他软件的安装一样,直接下一步下一步就好了。
需要配置的一步
Allowed hosts(this is the IP of the nagios (or other) server)
此处填写 Nagios 监控服务器的ip
NsClient password
密码可以为空,如果该处设置了密码,监控端就需要加上-s参数加密码认证
勾选前面四项
modules块我未启用wmi check ,该插件的功能是可以通过编写本地脚本,调用被监控端的wmi系统进程来监控要监控的内容 。
如果配置完了上面的配置,需求有变更,需要更改时,可以进到nscp的安装目录,修改配置文件。其配置文件示例如下:
[/modules]
CheckDisk = 1
CheckEventLog = 1
CheckExternalScripts = 1
CheckNSCP = 1
CheckHelpers = 1
CheckSystem = 1
NRPEServer = 1
NSCAClient = 1
NSClientServer = 1
; Undocumented section
[/settings/default]
; ALLOWED HOSTS - A comaseparated list of allowed hosts. You can use netmasks (/ syntax) or * to create ranges.
allowed hosts = 192.168.10.11
[/modules]
以上我只列出了部分配置,配置方件以” ;”做为注释 。具体每项前,一般都有注释说明是做什么用途的。
二、被控端配置相关
默认安装完之后,就可以使用 。如果不能正常使用可以以下几方法检测 。
1、首先用server端的check_nrpe和check_nt插件对被控端的机器进行检测,看是否正常 ?
[root@Nagios-Server /]# ./check_nt -H 192.168.10.13 -p 12489 -v UPTIME
System Uptime - 23 day(s) 9 hour(s) 57 minute(s)
[root@Nagios-Server /]# ./check_nrpe -H 192.168.10.13
I (0,4,0,172 2014-02-28) seem to be doing fine...
如果能正常输出,表示正常 。需要注意的是check_nt默认检测的端口是 1248 ,而nscp 默认提供的check_nt端口是12489 。
2、如果上面的输出不正常。先在监控端使用下面的命令检测端口监听是否正常 。即确认是否启动 。
nestat -ano|findstr 5666
nestat -ano|findstr 12489
如果正常监听,再查看防火墙是否允许通过 防火墙 –> 例外 –> 添加端口 5666/TCP 12489/TCP 。
3、如果端口都未发现监听,就需要手动启下服务 。
services.msc –> NSClient++ 属性–> 登录 —> 允许服务与桌面交互 –> 确定
三、nagios server端配置
关于nrpe 、nsca块不用新增,一般在检测其他机器时 ,都会事先配置过的 。这里只讲下check_nt ,配置如下:
define command{
command_name check_nt
command_line $USER1$/check_nt -H $HOSTADDRESS$ -p 12489 -v $ARG1$ $ARG2$
}
如果设置了密码,其中command_line的行,需要换成下面的:
?
1
command_line $USER1$/check_nt -H $HOSTADDRESS$ -p 12489 -s 888888 -v $ARG1$ $ARG2$
对主机监测的cfg配置文件增加下面的内容:
define service{
use windows-service,srv-pnp
host_name Nagios-windows
service_description Uptime
check_command check_nt!UPTIME
}
define service{
use windows-service,srv-pnp
host_name Nagios-windows
service_description CPU Load
check_command check_nt!CPULOAD!-l 5,80,90
}
define service{
use windows-service,srv-pnp
host_name Nagios-windows
service_description D: Drive Space
check_command check_nt!USEDDISKSPACE!-l d -w 80 -c 90
}
define service{
use windows-service
host_name Nagios-windows
service_description java
check_command check_nt!PROCSTATE!-d SHOWALL -l java.exe
}
define service{
use windows-service
host_name Nagios-windows
service_description explorer
check_command check_nt!PROCSTATE!-d SHOWALL -l exploer.exe
}
平时在对windows监控时主要使用check_nt插件,check_nt的其他用法,可以在nagios server的libexec目录里执行./check_nt -h查看更多帮助说明。如果想使用check_nrpe也可以,不过需要先在NSClient或nscp安装目录下的nsclient.ini配置文件中 进行配置定义:
check_cpu = checkCPU warn=80 crit=90 time=5m time=1m time=30s
check_disk = CheckDriveSize MinWarn=30% MinCrit=15% CheckAll FilterType=FIXED
使用和linux上的check_nrpe一样:
[root@Nagios-Server /]# ./check_nrpe -H 192.168.10.13 -c check_cpu
OK CPU Load ok.|'5m'=6%;80;90 '1m'=8%;80;90 '30s'=9%;80;90
十一、Nagios邮件报警的配置
11.1 安装sendmail 组件
首先要确保sendmail 相关组件的完整安装,我们可以使用如下的命令来完成sendmail 的安装:
[root@Nagios-Server /]# yum install -y sendmail*
然后重新启动sendmail服务:
[root@Nagios-Server /]# service sendmail restart
然后发送测试邮件,验证sendmail的可用性:
[root@Nagios-Server /]# echo "Hello World" | mail david.tang@bsmart.cn
11.2 邮件报警的配置
在上面我们已经简单配置过了/usr/local/nagios/etc/objects/contacts.cfg 文件,
Nagios 会将报警邮件发送到配置文件里的E-mail 地址。


